Showing posts with label Linux. Show all posts

Monday, 2 March 2015

System Program Problem Detected – How To Fix Or Remove It In Ubuntu

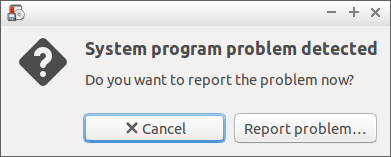
if you’re an Ubuntu user, probably sometimes or often, you may get an error “System Program Problem detected”. Ubuntu has a built-in utility called Apport, which is used to notify you whenever a program crashes.
_001
The Apport program will notify this error whenever you log in to your Ubuntu system. This is normal, you don’t have to panic or afraid of this error.
You have two choices to get rid of this error. By reporting this error, the developers may aware of the reasons that caused this error, and they might try to fix them in near future. Or you can simply disable this notifications permanently.

How To Fix It?

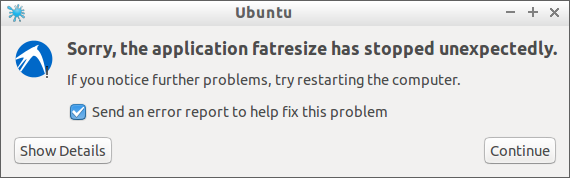
Well, you can’t fix this error yourself, but you can notify the developers to do it. This is the recommended way, and It doesn’t take too long. Click on the “Report Problem” button on the error dialog box. You’ll be asked to enter your administrative account password. Then, click Continue to send the error report to the developers to help fix this problem.
Ubuntu_002
Make sure connected with an Internet connection. Once you submitted the error report, the developers might look into the reports, and try to fix the errors in the next releases.
After completing the submission, you can delete the crash report files from your local system. To view the list of crash report files, enter the following command:
ls /var/crash/
Sample output:
_usr_bin_gksu.1000.crash       _usr_sbin_fatresize.0.uploaded
_usr_bin_nm-applet.1000.crash  _usr_share_apport_apport-gtk.1000.crash
_usr_sbin_fatresize.0.crash    _usr_share_bleachbit_bleachbit.py.0.crash
_usr_sbin_fatresize.0.upload
Remove all of them using command:
sudo rm -fr /var/crash/*
Now, reboot the system, and check if that error comes again.

How To Disable it?

If the above method doesn’t help, and you’re keep getting the same error over and over, it is better to disable Apport feature permanently. Though it is not recommended, but you can keep away from this annoying error at every reboot.
To do that, edit file /etc/default/apport,
sudo nano /etc/default/apport
Find the line enabled=1, and change its value to 0(zero).
# set this to 0 to disable apport, or to 1 to enable it
# you can temporarily override this with
# sudo service apport start force_start=1
enabled=0
Save and close the file.
Then, stop the apport service.
sudo stop apport
Now, Apport won’t display any errors in future.
That’s it. Cheers!

Linux Basics: How To Check If A Package Is Installed Or Not In Ubuntu

If you’re managing Debian or Ubuntu servers, probably, you may use dpkg or apt-get commands often. These two commands are used to install, remove, update packages.
In this brief tutorial, let us see how to check if a package is installed or not in DEB based systems.
To check whether a particular package for example firefox, is installed or not using command:
dpkg -s firefox
Sample output:
 Package: firefox
 Status: install ok installed
 Priority: optional
 Section: web
 Installed-Size: 93339
 Maintainer: Ubuntu Mozilla Team <ubuntu-mozillateam@lists.ubuntu.com>
 Architecture: amd64
 Version: 35.0+build3-0ubuntu0.14.04.2
 Replaces: kubuntu-firefox-installer
 Provides: gnome-www-browser, iceweasel, www-browser
 Depends: lsb-release, libasound2 (>= 1.0.16), libatk1.0-0 (>= 1.12.4), libc6 (>= 2.17), libcairo2 (>= 1.2.4), libdbus-1-3 (>= 1.0.2), libdbus-glib-1-2 (>= 0.78), libfontconfig1 (>= 2.9.0), libfreetype6 (>= 2.2.1), libgcc1 (>= 1:4.1.1), libgdk-pixbuf2.0-0 (>= 2.22.0), libglib2.0-0 (>= 2.37.3), libgtk2.0-0 (>= 2.24.0), libpango-1.0-0 (>= 1.22.0), libpangocairo-1.0-0 (>= 1.14.0), libstartup-notification0 (>= 0.8), libstdc++6 (>= 4.6), libx11-6, libxcomposite1 (>= 1:0.3-1), libxdamage1 (>= 1:1.1), libxext6, libxfixes3, libxrender1, libxt6
 Recommends: xul-ext-ubufox, libcanberra0, libdbusmenu-glib4, libdbusmenu-gtk4
 Suggests: ttf-lyx
 Conffiles:
 /etc/firefox/syspref.js 09e457e65435a1a043521f2bd19cd2a1
 /etc/apport/blacklist.d/firefox ee63264f847e671832d42255912ce144
 /etc/apport/native-origins.d/firefox 7c26b75c7c2b715c89cc6d85338252a4
 /etc/apparmor.d/usr.bin.firefox f54f7a43361c7ecfa3874abca2f292cf
 Description: Safe and easy web browser from Mozilla
 Firefox delivers safe, easy web browsing. A familiar user interface,
 enhanced security features including protection from online identity theft,
 and integrated search let you get the most out of the web.
 Xul-Appid: {ec8030f7-c20a-464f-9b0e-13a3a9e97384}
As you see in the above output, the firefox is installed.
Also, you can do the same using dpkg-query command. This command displays the decent output, and ofcourse, you can wild cards too.
dpkg-query -l firefox
Sample output:
Desired=Unknown/Install/Remove/Purge/Hold
| Status=Not/Inst/Conf-files/Unpacked/halF-conf/Half-inst/trig-aWait/Trig-pend
|/ Err?=(none)/Reinst-required (Status,Err: uppercase=bad)
||/ Name                                 Version                 Architecture            Description
+++-====================================-=======================-=======================-=============================================================================
ii  firefox                              35.0+build3-0ubuntu0.14 amd64                   Safe and easy web browser from Mozilla
To list all installed package in your system, enter the following command
dpkg --get-selections
Sample output:
abiword                        install
abiword-common                    install
accountsservice                    install
acl                        install
adduser                        install
alsa-base                    install
alsa-utils                    install
anacron                        install
app-install-data                install
apparmor                    install
.
.
.
zeitgeist                    install
zeitgeist-core                    install
zeitgeist-datahub                install
zenity                        install
zenity-common                    install
zip                        install
zlib1g:amd64                    install
zlib1g:i386                    install
The above might be very long depending upon the number of packages you have installed on your system.
You can also filter through grep to get results for the exact package you need. For example, I want to see which gcc packages are already installed on my system using dpkg command:
dpkg --get-selections | grep gcc
Sample output:
gcc                        install
gcc-4.8                        install
gcc-4.8-base:amd64                install
gcc-4.8-base:i386                install
gcc-4.9-base:amd64                install
gcc-4.9-base:i386                install
libgcc-4.8-dev:amd64                install
libgcc1:amd64                    install
libgcc1:i386                    install
Additionally, you can find location of the files within a package using the parameter “-L”.
dpkg -L gcc-4.8
Sample output:
/.
/usr
/usr/share
/usr/share/doc
/usr/share/doc/gcc-4.8-base
/usr/share/doc/gcc-4.8-base/README.Bugs
/usr/share/doc/gcc-4.8-base/NEWS.html
/usr/share/doc/gcc-4.8-base/quadmath
/usr/share/doc/gcc-4.8-base/quadmath/changelog.gz
/usr/share/doc/gcc-4.8-base/gcc
.
.
.
/usr/bin/x86_64-linux-gnu-gcc-4.8
/usr/bin/x86_64-linux-gnu-gcc-ar-4.8
/usr/bin/x86_64-linux-gnu-gcov-4.8
That’s all for now. Hope this short tutorial will useful for you.


Good day!

Knowing your hardware on Linux

In linux, there are a few ways that you can know you hardware details without opening the chassis of your machine. Below are a few ways that I know and hopefully can help linux users out there;
  1. Refer to the /proc directory. This directory contains a few files that can give you information about your hardware such as memory (meminfo), processor (cpuinfo), partitions (partition) and many more
  2. Use “lspci” command. This is a command to list all pci devices connected to your machine
  3. Use “lshw” command. This command will list out all hardware installed on your system. Available in ubuntu
  4. Use “kudzu -p” command. This is redhat/centos hardware probing and installing tool. Use “kudzu -p” to display all the hardware connected to the system
  5. Use “dmidecode” command. This is a tool for dumping bios information into human readable form