Showing posts with label COMPUTER. Show all posts

Thursday, 7 September 2017

To copy the same cell value ( do not increment cell number) in excel without increment in excel formula while dragging

For example if we have a excel sheet with tables in which we have data,
There are two sheets namely, PRESENT and DATESHEET.

In which the datesheet A1 cell consisting todays date in one format and C1 cell consisting report exported time and E1 consisting dateTime according to Database format. These three are required in our database to generate a report.

There is a requirement the report to be generated datewise format, But as we export the data from a website or database the date field is not present , so we need to export the data in a excel/csv format and we need to right a script in which the date field should be added.

suppose our data is exported to sheet namelt PRESENT ( here I have taken attendance report example)

As said earlier we have datesheet and present sheet. Now we need open a new tab/sheet in our excel file with name SCRIPT

In this script sheet we need to write the formula as stated below

=CONCATENATE("insert into daypresent(slno,office_name,today_date,report_time,db_datetime,tot_registered_emp,
tot_present) values('",$present.A4,"','",$present.B4,"','",$datesheet.$A$1,"','",
$datesheet.$C$1,"','",$datesheet.$E$1,"','",$present.C4,"','",$present.E4,"');")

Kindly observe in the above formula we are using Sheetname.Cell_reference prefixed with $ symbol. The symbol refer to that particular sheet and the specified cell. So here we are concatenating the two sheets cells in our script sheet.

Fine, after entering the formula in the first row in script sheet we can get the all records by simply dragging the cell to the rows (this is depends on our database record count). To the count we need to drag the formula.

Here is the case, The date is common for all the rows when we drag the cell formula the excel feature increment the cell value automatically we makes the next insert statement for row two . So in the next cell the formula becomes

=CONCATENATE("insert into daypresent(slno,office,tdate,rdate,rtime,regemp,present) values('",$present.A5,"','",$present.B5,"','",$datesheet.$A$1,"','",$datesheet.$C$1,"','",
$datesheet.$E$1,"','",$present.C5,"','",$present.E5,"');")

Present.A4 to Present.A5 , Present.B4 to Present.B5 .....       this is what we required but
 what about the datesheet we need the same cell value for all the rows

to achieve this, we need to give $datesheet.$A$1

the  cell values remains same even we drag the contents if we specify $A$1. That is the cell count wont increment

Thursday, 10 December 2015

Got Error "C:\users\..\AppData\Local\Temp;c:" while installing a software

err.jpg
If you encounter the above error while installing a software, Do the following steps:
The above error encounters when the user defined environment variable "TEMP" is updated. For example, If we installed JDK , the main important part after installing JDK is setting PATH .. somehow, for some need we need to set TEMP variable also, In that case, this TEMP variable creates the error while installing since the ":" is not allowed in the folder names and here in path we have a ';' followed by 'C:' generates a windows error 
Your %TEMP% environment variable is screwy.  Do this:
- Open Control Panel
- System
- Advanced System Settings
- Environment Variables
- In the User Variables, select TEMP and click Edit
- Remove the semi-colon (;) and everything after it
- OK your way out of all the dialogs
- Try installing Software again
Hope this helps!!!

Saturday, 31 October 2015

Start XAMPP Server automatically on windows Startup

Follow the Steps:-

1) First you need to configure your xampp setting. RUN XAMPP and follow image.


2) Now, to run any exe at the start up. Windows need to see the Run log. Exe file present in the RUN.log windows runs those files.

3) So to start Xampp. We have to make its log in RUN.

4) windows + R (i.e Open RUN) type REGEDIT >HKEY_LOCAL_MACHINE>SOFTWARE>
     MICROSOFT>WINDOWS>CURRENT VISION>RUN.


5)Now right click in window> NEW>STRING VALUE or alt+ E > NEW>STRING VALUE. it will add new file in list. name it by XAMPP. 

6) Right Click on this File. Select MODIFY> in String Data field type path of xampp_start.exe
c:\xampp\xampp_start.exe > click on ok.


7) Now LOG OFF . Again on LOG ON you will find your Xampp started automatically.


8) It will now even show any xampp window running or minimized.  Check it by running  any PHP file in browser. 

Wednesday, 29 July 2015

STOP loading previous pages when chrome browser started in ubuntu

While Google gets to work fixing the Chrome battery drain issue affecting Windows users, an easy interim solution may help preserve laptop battery life in the meantime.
The fix? Closing the browser when it’s not needed.

Captain Obvious

Historically, closing an application in Windows is straightforward: you click or tap on the ‘x’ window control button.
Depending on your settings, this isn’t always the case with Chrome; closing doesn’t always mean it fully exits. The browser often continues to run in the background on Windows (and Linux) – something you might never notice.

The Reason Why: You

Whether this happens or not depends on the sort of applications and extensions you have installed in Chrome. Some of these will “ask” the browser to stay awake so that they can continue to function; e.g., to deliver notifications of new e-mail messages or keep an active IRC chat alive.
Google makes it easy to tell when background apps are active: just look for the Google Chrome icon in the system tray (bottom right corner of your desktop screen). Click on this emblem to view a list of active tasks and a access a proper ‘Exit’ option.
If want to stop Chrome from running in the background entirely (i.e., so that it always exits when closed), regardless of extension, you can. You just need to tell it to.

How to Stop Chrome Running in the Background

On Windows or Linux click on the Chrome icon in the task bar/system tray, find the ‘Let Chrome run…’ option and click/tap it to disable/toggle the checkmark off.
It’s that simple. 
The behaviour can also be changed through the browser’s main settings page:
  • Click on the Chrome menu (or press Alt+E)
  • Select Settings
  • Click on the link titled ‘Show advanced settings
  • Under the section headed ‘System‘ untick the box next to “Continue running background apps when Google Chrome is closed”
To reenable the feature simply repeat the steps above but reversing the final step.

Friday, 17 April 2015

Setting a CRON Job in UBUNTU


Cron job written so automatic backup doing by the server.

Setting A CRON Job in UBUNTU :


Method 1:

1. Goto Super User by giving the command #su root (here is the super user is root not the same in every system)

2.  man crontab -- gives the detials about the crontab, if needed check the document once before proceeding, if the command not existing install Gnome schedule task tool.

Install "Gnome schedule tasks tool", to install this use the command as
 # sudo apt-get install gnome-schedule

3. start the crontab in terminal using the command

    #crontab -e (should be super user to execute this command)  
    for help use the command ( #man 5 crontab ).
  +--------------------------------------------------------------------+
  |  -e --> editor                                                 |
  |  -l  --> current job display on standard output     |
  |  -r  --> current crontab to be removed                |
  +--------------------------------------------------------------------+

4. Before editing or assigning a task check the command which is going to added in crontab executing or not from the current location.

5. Here in this case, the shell file "bakup.sh" is in /usr/bin/server/bakup folder. so the line added at the end is

   0 0 * * * user_name sh /usr/bin/server/bakup/bakup.sh

   The above command executes on every day at 12 A.M, ie., the db backup taken at every day midnight.

  Another example,

  0 3 * * 0 root /sbin/shutdown -r +5

 The above command restart the server at 3 A.M on every sunday.

  +---------------------------------------------------------------------------------------------------------------------------------------------+
  | Format is minute(0-59) hour(0-23,0=midnight) day(1-31) month(1-12) weekday(0-6,0 or 7=sunday)  |
  | 0 0 * * *        --->  midnight on everyday  |
  | 0 0 * * 1-5     --->  midnight every weekday  |
  | 0 0 1,15 * *   --->  midnight on 1st and 15th of month  |
  | 0 0 1 * 5       --->  midnight on 1st of month and every friday  |
  +---------------------------------------------------------------------------------------------------------------------------------------------+


Method 2:

1. Login as root user and execute the following command.
    # vim /etc/crontab.

2. At the end of the file add the line of command which is to be executed

     0 0 * * * user_name sh /usr/bin/server/bakup/bakup.sh  (Here in our case, the shell file "bakup.sh" is in /usr/bin/server/bakup folder. so the line added at the end)
 

Manual for cron job settings:


Linux Crontab Format

MIN HOUR DOM MON DOW CMD
Table: Crontab Fields and Allowed Ranges (Linux Crontab Syntax)
Field Description Allowed Value
MIN Minute field 0 to 59
HOUR Hour field 0 to 23
DOM Day of Month 1-31
MON Month field 1-12
DOW Day Of Week 0-6
CMD Command Any command to be executed.

1. Scheduling a Job For a Specific Time

The basic usage of cron is to execute a job in a specific time as shown below. This will execute the Full backup shell script (full-backup) on 10th June 08:30 AM.

Please note that the time field uses 24 hours format. So, for 8 AM use 8, and for 8 PM use 20.

30 08 10 06 * /home/ramesh/full-backup
30 – 30th Minute
08 – 08 AM
10 – 10th Day
06 – 6th Month (June)
* – Every day of the week

2. Schedule a Job For More Than One Instance (e.g. Twice a Day)

The following script take a incremental backup twice a day every day.

This example executes the specified incremental backup shell script (incremental-backup) at 11:00 and 16:00 on every day. The comma separated value in a field specifies that the command needs to be executed in all the mentioned time.

00 11,16 * * * /home/ramesh/bin/incremental-backup
00 – 0th Minute (Top of the hour)
11,16 – 11 AM and 4 PM
* – Every day
* – Every month
* – Every day of the week

3. Schedule a Job for Specific Range of Time (e.g. Only on Weekdays)

If you wanted a job to be scheduled for every hour with in a specific range of time then use the following.

Cron Job everyday during working hours

This example checks the status of the database everyday (including weekends) during the working hours 9 a.m – 6 p.m

00 09-18 * * * /home/ramesh/bin/check-db-status
00 – 0th Minute (Top of the hour)
09-18 – 9 am, 10 am,11 am, 12 am, 1 pm, 2 pm, 3 pm, 4 pm, 5 pm, 6 pm
* – Every day
* – Every month
* – Every day of the week
Cron Job every weekday during working hours

This example checks the status of the database every weekday (i.e excluding Sat and Sun) during the working hours 9 a.m – 6 p.m.

00 09-18 * * 1-5 /home/ramesh/bin/check-db-status
00 – 0th Minute (Top of the hour)
09-18 – 9 am, 10 am,11 am, 12 am, 1 pm, 2 pm, 3 pm, 4 pm, 5 pm, 6 pm
* – Every day
* – Every month
1-5 -Mon, Tue, Wed, Thu and Fri (Every Weekday)

4. How to View Crontab Entries?

View Current Logged-In User’s Crontab entries

To view your crontab entries type crontab -l from your unix account as shown below.

ramesh@dev-db$ crontab -l
@yearly /home/ramesh/annual-maintenance
*/10 * * * * /home/ramesh/check-disk-space

[Note: This displays crontab of the current logged in user]
View Root Crontab entries

Login as root user (su – root) and do crontab -l as shown below.

root@dev-db# crontab -l
no crontab for root
Crontab HowTo: View Other Linux User’s Crontabs entries

To view crontab entries of other Linux users, login to root and use -u {username} -l as shown below.

root@dev-db# crontab -u sathiya -l
@monthly /home/sathiya/monthly-backup
00 09-18 * * * /home/sathiya/check-db-status

5. How to Edit Crontab Entries?

Edit Current Logged-In User’s Crontab entries

To edit a crontab entries, use crontab -e as shown below. By default this will edit the current logged-in users crontab.

ramesh@dev-db$ crontab -e
@yearly /home/ramesh/centos/bin/annual-maintenance
*/10 * * * * /home/ramesh/debian/bin/check-disk-space
~
"/tmp/crontab.XXXXyjWkHw" 2L, 83C

[Note: This will open the crontab file in Vim editor for editing.
Please note cron created a temporary /tmp/crontab.XX... ]
When you save the above temporary file with :wq, it will save the crontab and display the following message indicating the crontab is successfully modified.

~
"crontab.XXXXyjWkHw" 2L, 83C written
crontab: installing new crontab
Edit Root Crontab entries

Login as root user (su – root) and do crontab -e as shown below.

root@dev-db# crontab -e
Edit Other Linux User’s Crontab File entries

To edit crontab entries of other Linux users, login to root and use -u {username} -e as shown below.

root@dev-db# crontab -u sathiya -e
@monthly /home/sathiya/fedora/bin/monthly-backup
00 09-18 * * * /home/sathiya/ubuntu/bin/check-db-status
~
~
~
"/tmp/crontab.XXXXyjWkHw" 2L, 83C

6. Schedule a Job for Every Minute Using Cron.

Ideally you may not have a requirement to schedule a job every minute. But understanding this example will will help you understand the other examples mentioned below in this article.

* * * * * CMD
The * means all the possible unit — i.e every minute of every hour through out the year. More than using this * directly, you will find it very useful in the following cases.

When you specify */5 in minute field means every 5 minutes.
When you specify 0-10/2 in minute field mean every 2 minutes in the first 10 minute.
Thus the above convention can be used for all the other 4 fields.

7. Schedule a Background Cron Job For Every 10 Minutes.

Use the following, if you want to check the disk space every 10 minutes.

*/10 * * * * /home/ramesh/check-disk-space
It executes the specified command check-disk-space every 10 minutes through out the year. But you may have a requirement of executing the command only during office hours or vice versa. The above examples shows how to do those things.

Instead of specifying values in the 5 fields, we can specify it using a single keyword as mentioned below.

There are special cases in which instead of the above 5 fields you can use @ followed by a keyword — such as reboot, midnight, yearly, hourly.

Table: Cron special keywords and its meaning
Keyword Equivalent
@yearly 0 0 1 1 *
@daily 0 0 * * *
@hourly 0 * * * *
@reboot Run at startup.

8. Schedule a Job For First Minute of Every Year using @yearly

If you want a job to be executed on the first minute of every year, then you can use the @yearly cron keyword as shown below.

This will execute the system annual maintenance using annual-maintenance shell script at 00:00 on Jan 1st for every year.

@yearly /home/ramesh/red-hat/bin/annual-maintenance

9. Schedule a Cron Job Beginning of Every Month using @monthly

It is as similar as the @yearly as above. But executes the command monthly once using @monthly cron keyword.

This will execute the shell script tape-backup at 00:00 on 1st of every month.

@monthly /home/ramesh/suse/bin/tape-backup

10. Schedule a Background Job Every Day using @daily

Using the @daily cron keyword, this will do a daily log file cleanup using cleanup-logs shell scriptat 00:00 on every day.

@daily /home/ramesh/arch-linux/bin/cleanup-logs "day started"

11. How to Execute a Linux Command After Every Reboot using @reboot?

Using the @reboot cron keyword, this will execute the specified command once after the machine got booted every time.

@reboot CMD

12. How to Disable/Redirect the Crontab Mail Output using MAIL keyword?

By default crontab sends the job output to the user who scheduled the job. If you want to redirect the output to a specific user, add or update the MAIL variable in the crontab as shown below.

ramesh@dev-db$ crontab -l
MAIL="ramesh"

@yearly /home/ramesh/annual-maintenance
*/10 * * * * /home/ramesh/check-disk-space

[Note: Crontab of the current logged in user with MAIL variable]

If you wanted the mail not to be sent to anywhere, i.e to stop the crontab output to be emailed, add or update the MAIL variable in the crontab as shown below.

MAIL=""

13. How to Execute a Linux Cron Jobs Every Second Using Crontab.

You cannot schedule a every-second cronjob. Because in cron the minimum unit you can specify is minute. In a typical scenario, there is no reason for most of us to run any job every second in the system.

14. Specify PATH Variable in the Crontab

All the above examples we specified absolute path of the Linux command or the shell-script that needs to be executed.

For example, instead of specifying /home/ramesh/tape-backup, if you want to just specify tape-backup, then add the path /home/ramesh to the PATH variable in the crontab as shown below.

ramesh@dev-db$ crontab -l

PATH=/bin:/sbin:/usr/bin:/usr/sbin:/home/ramesh

@yearly annual-maintenance
*/10 * * * * check-disk-space

[Note: Crontab of the current logged in user with PATH variable]

15. Installing Crontab From a Cron File

Instead of directly editing the crontab file, you can also add all the entries to a cron-file first. Once you have all thoese entries in the file, you can upload or install them to the cron as shown below.

ramesh@dev-db$ crontab -l
no crontab for ramesh

$ cat cron-file.txt
@yearly /home/ramesh/annual-maintenance
*/10 * * * * /home/ramesh/check-disk-space

ramesh@dev-db$ crontab cron-file.txt

ramesh@dev-db$ crontab -l
@yearly /home/ramesh/annual-maintenance

*/10 * * * * /home/ramesh/check-disk-space
Note: This will install the cron-file.txt to your crontab, which will also remove your old cron entries. So, please be careful while uploading cron entries from a cron-file.txt.
    

Tuesday, 3 March 2015

Fix Windows 8 (Dual Boot) NTFS Partition Mount Failure In Ubuntu

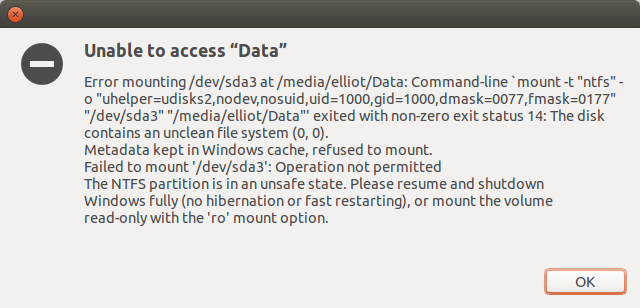
Below is error message viewed when you try mounting NTFS partitions:

no_no

Error mounting /dev/sda3 at /media/elliot/Data: Command-line `mount -t "ntfs" -o "uhelper=udisks2,nodev,nosuid,uid=1000,gid=1000,dmask=0077,fmask=0177" "/dev/sda3" "/media/elliot/Data"' exited with non-zero exit status 14: The disk contains an unclean file system (0, 0).
Metadata kept in Windows cache, refused to mount.
Failed to mount '/dev/sda3': Operation not permitted
The NTFS partition is in an unsafe state. Please resume and shutdown
Windows fully (no hibernation or fast restarting), or mount the volume
read-only with the 'ro' mount option.

Reasons

After series of searches, reasons for this were

1. Windows didn’t shutdown properly or has been hibernated.
2. Fast start up has been enabled in Windows 8 (this is by default)

Solutions

1. Reboot Windows and then boot into Ubuntu.

2. Disable fast start up in Windows 8, by navigating to Control Panel –> Hardware and Sound –> Power Options –> System Setting –> Select What the power buttons does and un-check the Turn on fast startup.


You should be able to access you NTFS partitions now.

Linux Basics: How To Convert Mp4 To MP3

Why do we need to convert from MP4 to MP3?
It saves spaces in our devices, and some of the basic model devices are not supported with mp4 extension. In this example, we are going to use ffmpeg to convert MP4 to MP3.
FFmpeg is a complete, cross-platform solution to record, convert and stream audio and video. It includes libavcodec – the leading audio/video codec library.
Install ffmpeg On Ubuntu
sudo apt-get install ffmpeg libavcodec-extra-53
Converting MP4 to MP3
Basic command:
ffmpeg -i filename.mp4 filename.mp3
Find out the more options of this command with man page. (man ffmpeg)
ffmpeg -i filename.mp4 -b:a 192K -vn filename.mp3
A stream specifier can match several stream, the option is then  applied to all of them. E.g. the stream specifier in “-b:a 128k” matches all audio streams.
By Script:
The following script is going to convert all file with extension .mp4 in the folder Music to .mp3.
#!/bin/bash
MP4FILE=$(ls ~/Music/ |grep .mp4)
for filename in $MP4FILE
do 
 name=`echo "$filename" | sed -e "s/.mp4$//g"`
 ffmpeg -i ~/Music/$filename -b:a 192K -vn ~/Music/$name.mp3
done

How To Find IP Conflicts In Linux

You all know what IP addresses are, right? How they are assigned to devices on a network to represent them. They are assigned by DHCP servers and the change frequently. Now there are two kinds of IP’s. The dynamic ones who change frequently (a few times a day) and the static ones who, as the name suggests, are static, as in they don’t change. Sometimes that creates conflicts. When a dynamic IP is assigned and there is already another device on the network with the same static IP. Or it can happen when there are more than one DHCP servers giving IP’s on the same network from the same subnet. If you’re having connectivity issues and suspect it is due to IP conflict you can use a tool called arp-scan to detect them.

This tool sends ARP (Address Resolution Protocol) packets on local network to collect the addresses. If there is multiple MAC addresses claiming the same IP address, then there is conflict.
To install arp-scan on Ubuntu or Debian type:

$ sudo apt-get install arp-scan

For Fedora, CentOS or Redhat:

$ sudo yum install arp-scan

To detect IP conflicts, run the following:

$ sudo arp-scan –I eth0 -l

An output example:

192.168.1.10   00:1b:a9:63:a2:4c       BROTHER INDUSTRIES, LTD.
192.168.1.30   00:1e:8f:58:ec:49       CANON INC.
192.168.1.33   00:25:4b:1b:10:20       Apple, Inc
192.168.1.37   10:9a:dd:55:d7:95       Apple Inc
192.168.1.38   20:c9:d0:27:8d:56       (Unknown)
192.168.1.39   d4:85:64:4d:35:be       Hewlett Packard
192.168.1.39   00:0b:46:e4:8e:6d       Cisco (DUP: 2)
192.168.1.40   90:2b:34:18:59:c0       (Unknown)


In this instance, the 19.168.1.39 IP is in conflict since it appears twice.

Get the revised print screen option in UBUNTU using shutter

About

Shutter is a feature-rich screenshot program for Linux based operating systems such as Ubuntu. You can take a screenshot of a specific area, window, your whole screen, or even of a website – apply different effects to it, draw on it to highlight points, and then upload to an image hosting site, all within one window. Shutter is freeopen-source, and licensed under GPL v3.

Capture

Shutter allows you to capture nearly anything on your screen without loosing control over your screenshots (tabbed interface). Here is an overview of what you can do with Shutter:
  • Capture a Specific Area
    This allows you to select an arbitrary region of your screen and capture only those parts you really need. Shutter offers two different tools to do so in order to meet any user’s taste.
  • Capture your Desktop
    Shutter 
    does not only capture all the contents of your desktop (or workspace) – it also supports Multi-monitor settings, e.g. capture the active monitor
  • Capture a Window
    Simply use your mouse to select the window you want to capture. Shutter will highlight the currently select window in an attractive and useful way. It is even possible to simply select a window from a list and capture it right a way.
  • Capture a Menu or Tooltip
    Capturing menus or tooltips is very easy with Shutter. You select one of the options and a (user-defined) countdown starts. During this time you can open the desired menu or let a specific tooltip come up. Shutter will recognize and capture it.
  • Capture a Website
    Shutter uses gnome-web-photo to capture a website without opening a browser window

PPA-Installation Guide

This is a step-by-step procedure for installing Shutter on Ubuntu, aimed at beginners or users who rarely worked with PPAs (Personal Package Archives) before.
Please note: This guide applies only to Ubuntu.

Ubuntu 9.10 (Karmic) and later

    1. You can add a PPA to your system with a single line in your terminal. Open a terminal and enter:
sudo add-apt-repository ppa:shutter/ppa
    1. Now, as a one-off, you should tell your system to pull down the latest list of software from each archive it knows about, including the PPA you just added:
sudo apt-get update
    1. Install Shutter
sudo apt-get install shutter

On older (pre 9.10) Ubuntu systems

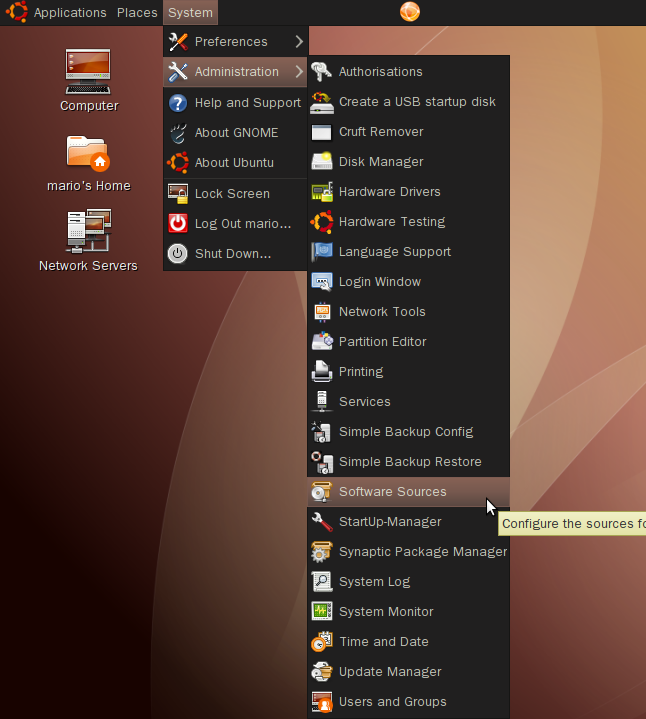
  1. Add Shutter PPA to your ‘Software Sources’
    Navigate to System ▸ Administration ▸ Software Sources
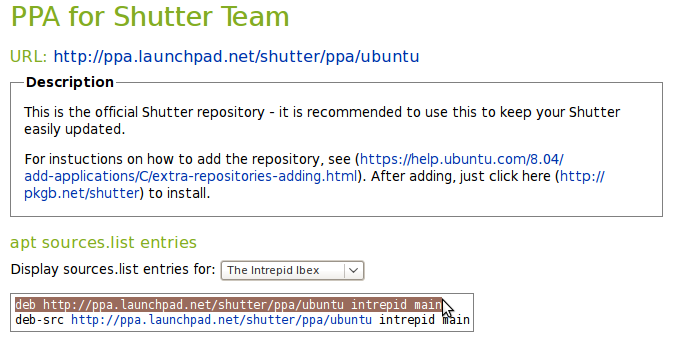
  2. Visit our PPA (hosted at Launchpad.net – https://launchpad.net/~shutter/+archive/ppa)
    Select your Ubuntu release and copy the first line into your clipboard (Ctrl+C) as shown below.
    step2_new2
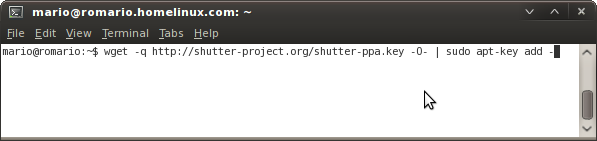
  3. Each PPA has its own unique key that is used to sign the packages in that archive. To add the PPA’s key to your own system open a terminal and enter:
    wget -q http://shutter-project.org/shutter-ppa.key -O- | sudo apt-key add -
    step2_1_new
    Hint: Don’t forget the trailing dash. You’ll see a confirming ‘OK’ when the command was successfull.
    (Until you add the PPA’s key to your own system, you’ll see warnings that you’re downloading from an untrusted source)
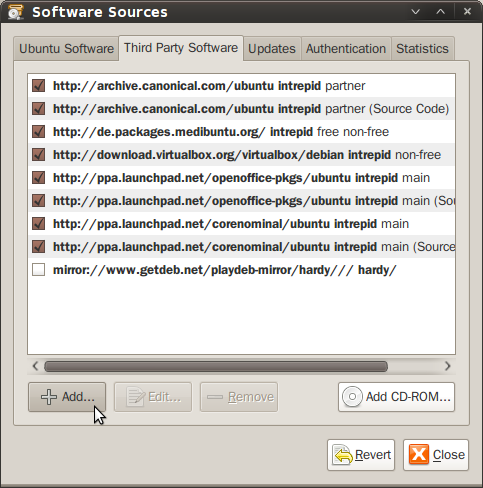
  4. Return to the ‘Software Sources’ window, navigate to the Third Party Software tab and hit the Addbutton.
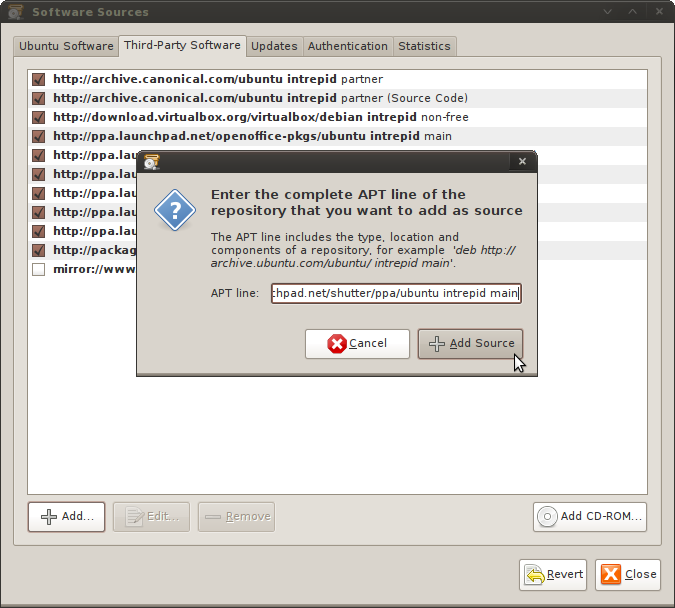
  5. Paste your clipboard content into the entry box of the following popup to add our repository to the list of software sources. Then click on Add Source.
    step4_new
  6. If everything worked as expected our repository should be activated now. You can now close the window.
    step5_new
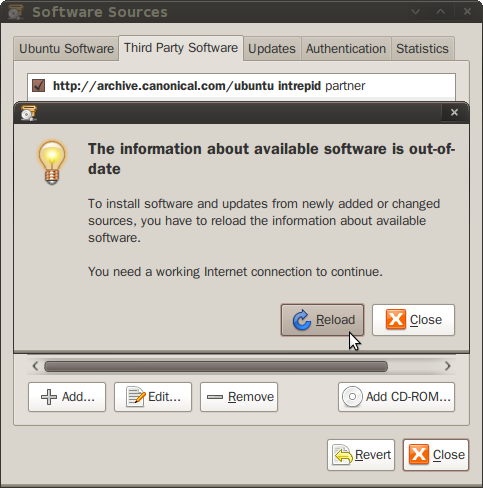
  7. When prompted to ‘Reload the information about available software’ press Reload and wait for the operation to complete.
  8. Now, just click here to install Shutter (using AptURL)
    step9_new
    or open a terminal and enter:
    sudo apt-get install shutter
  9. After the package manager has done its work you will be able to start Shutter for the first time using the menu entry.
    step10_new

Monday, 2 March 2015

PHPEclipse -- eclipse Editor for PHP projects on UBUNTU

This installation guide gives brief instructions on setting up Eclipse for PHP development.
Note: Much of this guide is obsolete. This information is retained below on this page to permit its use as a base for updating with instructions on more recent versions.

Installation

10.04 Lucid

Eclipse is available to install via the Synaptic Package manager. To use for development of PHP requires additional changes/customisations within the Eclipse environment itself.
The package may be installed by selecting eclipse within Synaptic, or the following at a command prompt:
  • $ sudo apt-get install eclipse
The version of Eclipse available via current repositories is 3.8.1Indigo.

Enabling PHP Support

As-standard, Eclipse does not come with support for PHP. This must be added, and added as root.
  1. Launch Eclipse as root from the command line:
    • $ sudo eclipse (gksudo causes an unusual warning).
  2. When the "Welcome to Eclipse" screen is displayed, select Help->Install New Software...
  3. The "Galileo" site must be added, click "Add..." and input:
  4. Once this is available, select "Galileo" in the Work with: drop-down list.
  5. Enter "php" into the filter text, two entries should be displayed for "PHP Developer Tools (PDT)"; one under Programming Languages, another under Web, XML, and Java EE Development. Select both and click "Next >".
  6. Verify that the items you wish to install are displayed on the "Install Details" screen and click "Finish".
  7. Eclipse will need restarted for the update to complete.
With this complete, you should be able to launch Eclipse under a normal user account and select New->Project...->PHP->PHP Project.

Previous instructions

Below are the prior contents of this page, all of which relate to older, now-unsupported, versions of Ubuntu.

Unsupported: Notice

This installation guide will install PHPEclipse into an Eclipse installation in your home directory or in the /opt directory (depending of your EclipseIDE installation method)
PHPEclipse is able to controll MySQL as well as Apache, and using dbg as a debugger. See below for instructions on controlling Apache using PHPEclipse.

Unsupported: Automated Installation

An automated installation of PHPEclipse is available via the Eclipse Update Manager.
  1. Start Eclipse as root, $sudo eclipse or $sudo -s then #eclipse
  2. Click on Help->Software Updates->Find/Install from file menu in Eclipse.
  3. Select the radio button labeled, "search for new features to install".
  4. Click on the "New Remote Site" button.
  5. Enter a name, and the URL: http://update.phpeclipse.net/update/nightly
  6. Click on "Finish".
  7. A list of features will be presented, open the list and check the one labeled "phpeclipse".
  8. Click on "Next"
  9. Follow the onscreen instructions to finish the automatic install.

Unsupported: Ubuntu Feisty 7.04 Fix

When you try to edit a .php file using the PHPeclipse editor, you will get an error message that tells you to look in the log. This problem arises due to problem with the default JVM used in Feisty. To fix the problem:
  1. Close eclipse and at the bash prompt:
  2. sudo apt-get install sun-java6-jre libxext6-dbg
  3. sudo nano -w /etc/eclipse/java_home
  4. Insert /usr/lib/jvm/java-6-sun on the line above /usr/lib/jvm/java-gcj
  5. Close and save the file

Unsupported: Installation

This document assumes you have a running Eclipse installed as described in EclipseIDE.
PHPEclipse is a plugin to Eclipse and should be placed in the $HOME/opt/eclipse/plugins directory for the personnal installation or /opt/eclipse/plugins for the global installation.
The PHPEclipse project is located at www.phpeclipse.de and you will find the zipped plugin files here.
  • Download the latest release (PHPEclipse1.1.3-2005-01-29 when this document where written) to your favorite download directory. Then change directory to the eclipse directory (personnal installation):
$ cd ~/opt/eclipse
or (global installation)
$ cd /opt/eclipse
  • Unzip the previously downloaded PHPEclipse plugin (use sudo if you used the EclipseIDE global installation method):
$ unzip ~/your_download_dir/PHPEclipse1.1.3-2005-01-29.zip
(substitute your_download_dir and zip file name to fit your system)
  • The plugin is now installed but "Eclipse 3.x caches all plugin.xml files into a single repository for quicker loading. If you used eclipse before installing PHPeclipse, you should start eclipse once with the -clean option. This -clean forces Eclipse to rebuild that repository. This applies to anything that is installed into eclipse by unzipping it into its plugins folder.":
$ eclipse -clean
Next time you may start Eclipse your favorite way, without the -clean option.

Unsupported: Controlling Apache from Eclipse

Configuring Apache

The first thing you'll want to do is have a working Apache install see ApacheMySQLPHP for details. The assumption is that you're installing Apache on a workstation that is seperate from your production web server.
In your favorite text editor open /etc/apache2/sites-available/default change DocumentRoot to somewhere in your home directory:
DocumentRoot /home/<username>/work

and

<Directory /home/<username>/work/>
Note: the above is just an example of my work environment change the path accordingly. Also, the PHP Browser that is part of PHPEclipse by default wants to open http://localhost/php/''your_script .
and reload Apache to recognize the new configuration:
/etc/init.d/apache2 reload

Configure PHPEclipse for Apache

Now that we have Apache configured for our development environment we can configure PHPEclipse to control Apache. First open Eclipse and click on:
Window > Preferences > PHPeclipse Web Development
This opens the PHPEclipse options dialog.
First click on PHP External Tools there's two things to change Run PHP command and Parser command:
Run PHP command default is /apache/php/php

change this to: 

/usr/bin/php

Parser command default is /apache/php/php -l -f {0}

change to:

/usr/bin/php -l -f {0}
Note: you'll need the php5-cli package installed for this to work.
Add a line to /etc/sudoers to allow admins to control apache2 without entering a password
sudo visudo

Append the following line
%admin ALL=NOPASSWD: /usr/sbin/apache2
Create a simple script to run apache2 via sudo
mkdir /home/<username>/bin
vi /home/<username>/bin/apache2
sudo /usr/sbin/apache2 $*
Next click on Apache under PHP External Tools where we'll need to change the Apache and Start Apache values:
Change Start Apache to:
-k start

and Apache to:
/home/<username>/bin/apache2
Then click Ok to apply.
To start Apache from Eclipse simply click the Start Apache icon.