Here I am consuming test webservice of Meeseva
Lets Create a sample Application
I am taking a DropDown to check whether the user having Income Certificate or not. If so the certificate number is supplied to our application and after pressing getData button the details of the certificate are populated and shown in our application.
To do this lets create our design page i.e., income.aspx page..
Create a panel with the controls:
<asp:Panel ID="income_panel" runat="server">
<table>
<tr>
<td colspan="2" align="center" style="font-size: 20px; font-weight: bold; color: darkblue">Consuming Web Service
<br />
<br />
</td>
</tr>
<tr>
<td align="right" style="width: 50%">
<asp:Label ID="Label99" runat="server" Font-Bold="true" Text="Do you belongs to Fee-Exemption category ? (Y/N):"></asp:Label>
</td>
<td align="left" class="auto-style1">
<asp:DropDownList ID="ddl_income" runat="server" Width="93px" AutoPostBack="True" Height="30px" OnSelectedIndexChanged="ddl_income_SelectedIndexChanged">
<asp:ListItem Selected="True" Value="1">--Select--</asp:ListItem>
<asp:ListItem Value="N">NO</asp:ListItem>
<asp:ListItem Value="Y">YES</asp:ListItem>
</asp:DropDownList>
</td>
</tr>
<tr>
<td colspan="2" align="center" style="width: 50%">
<asp:Label ID="lbl_inc_msg" runat="server" Font-Bold="true" ForeColor="Green" Font-Size="15px"></asp:Label>
</td>
</tr>
<tr>
<td align="right">
<asp:Label ID="lbl_inc_cer" runat="server" Font-Bold="true" Text="Enter Income Certificate No :"></asp:Label>
</td>
<td align="left" class="auto-style1">
<br />
<asp:TextBox ID="txt_inc" runat="server" ValidationGroup="income" MaxLength="14"></asp:TextBox>
<asp:Button ID="btn_income" runat="server" Text="GetData" OnClick="btn_income_Click" />
<asp:RequiredFieldValidator ID="rqfv_income_no" runat="server" ErrorMessage="*Required" ControlToValidate="txt_inc" ValidationGroup="income" ForeColor="Red"></asp:RequiredFieldValidator>
<asp:RegularExpressionValidator ID="rgfv_income_no" runat="server" ErrorMessage="Invalid Income Certificate Number" ControlToValidate="txt_inc" ValidationGroup="income" ForeColor="Red" ValidationExpression="IC[0-9]{12,12}"></asp:RegularExpressionValidator>
</td>
</tr>
<tr>
<td colspan="2">
<div id="div_inc_online" runat="server">
<table width="100%" class='box'>
<tr style="background-color: aquamarine">
<td colspan="2" align="center" style="font-size: 20px; font-weight: bold; color: green">Online Income Certificate Details</td>
</tr>
<tr>
<td align="right">
<asp:Label ID="Label10" runat="server" Font-Bold="true" Text="Certificate Number :"></asp:Label>
</td>
<td align="left">
<asp:Label ID="lbl_inc_cer_no" runat="server"></asp:Label>
</td>
</tr>
<tr>
<td align="right">
<asp:Label ID="Label14" runat="server" Font-Bold="true" Text="Name:"></asp:Label>
</td>
<td align="left">
<asp:Label ID="lbl_inc_name" runat="server"></asp:Label>
</td>
</tr>
<tr>
<td align="right">
<asp:Label ID="Label18" runat="server" Font-Bold="true" Text="Father Name:"></asp:Label>
</td>
<td align="left">
<asp:Label ID="lbl_inc_fname" runat="server"></asp:Label>
</td>
</tr>
<tr>
<td align="right">
<asp:Label ID="Label20" runat="server" Font-Bold="true" Text="Date of Birth:"></asp:Label>
</td>
<td align="left">
<asp:Label ID="lbl_inc_dob" runat="server"></asp:Label>
</td>
</tr>
<tr>
<td align="right">
<asp:Label ID="Label22" runat="server" Font-Bold="true" Text="Total Income:"></asp:Label>
</td>
<td align="left">
<asp:Label ID="lbl_inc_inc" runat="server"></asp:Label>
</td>
</tr>
</table>
</div>
</td>
</tr>
</table>
<asp:HiddenField ID="hid_mobile" runat="server"></asp:HiddenField>
</asp:Panel>
The Image of the page looks like

Now Lets create our CS page with the code behind for each control:
The CS Code is
protected void Page_Load(object sender, EventArgs e)
{
lbl_inc_cer.Visible = false;
txt_inc.Visible = false;
income_panel.Visible = false;
lbl_inc_cer_no.Visible = false;
lbl_inc_msg.Text = "";
btn_income.Visible = false;
}
protected void ddl_income_SelectedIndexChanged(object sender, EventArgs e)
{
if (ddl_income.SelectedValue == "Y")
{
lbl_inc_cer.Visible = true;
txt_inc.Visible = true;
income_panel.Visible = true;
lbl_inc_cer_no.Visible = true;
lbl_inc_msg.Text = "";
btn_income.Visible = true;
}
else
{
lbl_inc_cer.Visible = false;
txt_inc.Visible = false;
income_panel.Visible = false;
lbl_inc_cer_no.Visible = false;
lbl_inc_msg.Text = "";
btn_income.Visible = false;
}
}
protected void btn_income_Click(object sender, EventArgs e)
{
this.Validate();
if (!this.IsValid) return;
Get_service_data();
div_inc_online.Visible = true;
//string mobile = Session["mobileno"].ToString();
string mobile = hid_mobile.Value.ToString();
}
public void Get_service_data()
{
XmlDocument xmldoc = new XmlDocument();
string uname, pwd;
uname = "APCET";
pwd = "************"; // Provide the Password Here
IncomeService.MeeSevaTransactions CI = new IncomeService.MeeSevaTransactions();
if (txt_inc.Text == "")
{
lbl_inc_msg.Text = "Certificate Number not given";
return;
}
else if (txt_inc.Text != "")
{
string inc_cer_no = txt_inc.Text;
string response;
try
{
response = CI.GetDetailsByAppNo(inc_cer_no, uname, pwd);
xmldoc.LoadXml(response);
//Response.Write("meeseva income Response:" + response.ToString().Trim());
}
catch (Exception ex)
{
// Response.Write("Meeseva Service Error" + ex.Message.ToString());
ScriptManager.RegisterClientScriptBlock(this, this.GetType(), "alertMessage", "alert('Not Fetching the Data from Service.Please try again.')", true);
div_inc_online.Visible = false;
}
if (xmldoc.SelectSingleNode("//Application_Number") != null)
{
if (xmldoc.SelectSingleNode("//Applicant_Name") != null)
lbl_inc_name.Text = xmldoc.SelectSingleNode("//Applicant_Name").InnerText;
if (xmldoc.SelectSingleNode("//FatHus_Name") != null)
lbl_inc_fname.Text = xmldoc.SelectSingleNode("//FatHus_Name").InnerText;
if (xmldoc.SelectSingleNode("//Date_Of_Birth") != null)
lbl_inc_dob.Text = xmldoc.SelectSingleNode("//Date_Of_Birth").InnerText;
if (xmldoc.SelectSingleNode("//Application_Number") != null)
lbl_inc_cer_no.Text = xmldoc.SelectSingleNode("//Application_Number").InnerText;
if (xmldoc.SelectSingleNode("//Total_Income") != null)
lbl_inc_inc.Text = xmldoc.SelectSingleNode("//Total_Income").InnerText;
//Send OTP
string mobile = hid_mobile.Value.ToString();
}
else
{
ScriptManager.RegisterClientScriptBlock(this, this.GetType(), "alertMessage", "alert('No Data Available .')", true);
}
}
}
So Now the IncomeService is to be included in our Project To do this follow the steps
The most important task when consuming a Web Service in an ASP.Net Web Application is adding the Web Service reference into the ASP.Net web application. So how to add it? Let us see the procedure.
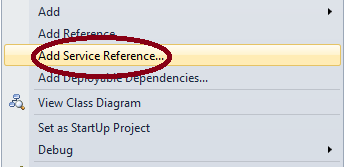
Right-click on the ASP.Net Web Application and click on "Add Service Reference" as in the following:


Lets Create a sample Application
I am taking a DropDown to check whether the user having Income Certificate or not. If so the certificate number is supplied to our application and after pressing getData button the details of the certificate are populated and shown in our application.
To do this lets create our design page i.e., income.aspx page..
Create a panel with the controls:
<asp:Panel ID="income_panel" runat="server">
<table>
<tr>
<td colspan="2" align="center" style="font-size: 20px; font-weight: bold; color: darkblue">Consuming Web Service
<br />
<br />
</td>
</tr>
<tr>
<td align="right" style="width: 50%">
<asp:Label ID="Label99" runat="server" Font-Bold="true" Text="Do you belongs to Fee-Exemption category ? (Y/N):"></asp:Label>
</td>
<td align="left" class="auto-style1">
<asp:DropDownList ID="ddl_income" runat="server" Width="93px" AutoPostBack="True" Height="30px" OnSelectedIndexChanged="ddl_income_SelectedIndexChanged">
<asp:ListItem Selected="True" Value="1">--Select--</asp:ListItem>
<asp:ListItem Value="N">NO</asp:ListItem>
<asp:ListItem Value="Y">YES</asp:ListItem>
</asp:DropDownList>
</td>
</tr>
<tr>
<td colspan="2" align="center" style="width: 50%">
<asp:Label ID="lbl_inc_msg" runat="server" Font-Bold="true" ForeColor="Green" Font-Size="15px"></asp:Label>
</td>
</tr>
<tr>
<td align="right">
<asp:Label ID="lbl_inc_cer" runat="server" Font-Bold="true" Text="Enter Income Certificate No :"></asp:Label>
</td>
<td align="left" class="auto-style1">
<br />
<asp:TextBox ID="txt_inc" runat="server" ValidationGroup="income" MaxLength="14"></asp:TextBox>
<asp:Button ID="btn_income" runat="server" Text="GetData" OnClick="btn_income_Click" />
<asp:RequiredFieldValidator ID="rqfv_income_no" runat="server" ErrorMessage="*Required" ControlToValidate="txt_inc" ValidationGroup="income" ForeColor="Red"></asp:RequiredFieldValidator>
<asp:RegularExpressionValidator ID="rgfv_income_no" runat="server" ErrorMessage="Invalid Income Certificate Number" ControlToValidate="txt_inc" ValidationGroup="income" ForeColor="Red" ValidationExpression="IC[0-9]{12,12}"></asp:RegularExpressionValidator>
</td>
</tr>
<tr>
<td colspan="2">
<div id="div_inc_online" runat="server">
<table width="100%" class='box'>
<tr style="background-color: aquamarine">
<td colspan="2" align="center" style="font-size: 20px; font-weight: bold; color: green">Online Income Certificate Details</td>
</tr>
<tr>
<td align="right">
<asp:Label ID="Label10" runat="server" Font-Bold="true" Text="Certificate Number :"></asp:Label>
</td>
<td align="left">
<asp:Label ID="lbl_inc_cer_no" runat="server"></asp:Label>
</td>
</tr>
<tr>
<td align="right">
<asp:Label ID="Label14" runat="server" Font-Bold="true" Text="Name:"></asp:Label>
</td>
<td align="left">
<asp:Label ID="lbl_inc_name" runat="server"></asp:Label>
</td>
</tr>
<tr>
<td align="right">
<asp:Label ID="Label18" runat="server" Font-Bold="true" Text="Father Name:"></asp:Label>
</td>
<td align="left">
<asp:Label ID="lbl_inc_fname" runat="server"></asp:Label>
</td>
</tr>
<tr>
<td align="right">
<asp:Label ID="Label20" runat="server" Font-Bold="true" Text="Date of Birth:"></asp:Label>
</td>
<td align="left">
<asp:Label ID="lbl_inc_dob" runat="server"></asp:Label>
</td>
</tr>
<tr>
<td align="right">
<asp:Label ID="Label22" runat="server" Font-Bold="true" Text="Total Income:"></asp:Label>
</td>
<td align="left">
<asp:Label ID="lbl_inc_inc" runat="server"></asp:Label>
</td>
</tr>
</table>
</div>
</td>
</tr>
</table>
<asp:HiddenField ID="hid_mobile" runat="server"></asp:HiddenField>
</asp:Panel>
The Image of the page looks like
Now Lets create our CS page with the code behind for each control:
The CS Code is
protected void Page_Load(object sender, EventArgs e)
{
lbl_inc_cer.Visible = false;
txt_inc.Visible = false;
income_panel.Visible = false;
lbl_inc_cer_no.Visible = false;
lbl_inc_msg.Text = "";
btn_income.Visible = false;
}
protected void ddl_income_SelectedIndexChanged(object sender, EventArgs e)
{
if (ddl_income.SelectedValue == "Y")
{
lbl_inc_cer.Visible = true;
txt_inc.Visible = true;
income_panel.Visible = true;
lbl_inc_cer_no.Visible = true;
lbl_inc_msg.Text = "";
btn_income.Visible = true;
}
else
{
lbl_inc_cer.Visible = false;
txt_inc.Visible = false;
income_panel.Visible = false;
lbl_inc_cer_no.Visible = false;
lbl_inc_msg.Text = "";
btn_income.Visible = false;
}
}
protected void btn_income_Click(object sender, EventArgs e)
{
this.Validate();
if (!this.IsValid) return;
Get_service_data();
div_inc_online.Visible = true;
//string mobile = Session["mobileno"].ToString();
string mobile = hid_mobile.Value.ToString();
}
public void Get_service_data()
{
XmlDocument xmldoc = new XmlDocument();
string uname, pwd;
uname = "APCET";
pwd = "************"; // Provide the Password Here
IncomeService.MeeSevaTransactions CI = new IncomeService.MeeSevaTransactions();
if (txt_inc.Text == "")
{
lbl_inc_msg.Text = "Certificate Number not given";
return;
}
else if (txt_inc.Text != "")
{
string inc_cer_no = txt_inc.Text;
string response;
try
{
response = CI.GetDetailsByAppNo(inc_cer_no, uname, pwd);
xmldoc.LoadXml(response);
//Response.Write("meeseva income Response:" + response.ToString().Trim());
}
catch (Exception ex)
{
// Response.Write("Meeseva Service Error" + ex.Message.ToString());
ScriptManager.RegisterClientScriptBlock(this, this.GetType(), "alertMessage", "alert('Not Fetching the Data from Service.Please try again.')", true);
div_inc_online.Visible = false;
}
if (xmldoc.SelectSingleNode("//Application_Number") != null)
{
if (xmldoc.SelectSingleNode("//Applicant_Name") != null)
lbl_inc_name.Text = xmldoc.SelectSingleNode("//Applicant_Name").InnerText;
if (xmldoc.SelectSingleNode("//FatHus_Name") != null)
lbl_inc_fname.Text = xmldoc.SelectSingleNode("//FatHus_Name").InnerText;
if (xmldoc.SelectSingleNode("//Date_Of_Birth") != null)
lbl_inc_dob.Text = xmldoc.SelectSingleNode("//Date_Of_Birth").InnerText;
if (xmldoc.SelectSingleNode("//Application_Number") != null)
lbl_inc_cer_no.Text = xmldoc.SelectSingleNode("//Application_Number").InnerText;
if (xmldoc.SelectSingleNode("//Total_Income") != null)
lbl_inc_inc.Text = xmldoc.SelectSingleNode("//Total_Income").InnerText;
//Send OTP
string mobile = hid_mobile.Value.ToString();
}
else
{
ScriptManager.RegisterClientScriptBlock(this, this.GetType(), "alertMessage", "alert('No Data Available .')", true);
}
}
}
So Now the IncomeService is to be included in our Project To do this follow the steps
Adding a Web Service Reference in the ASP.Net Web Application
The most important task when consuming a Web Service in an ASP.Net Web Application is adding the Web Service reference into the ASP.Net web application. So how to add it? Let us see the procedure.
Right-click on the ASP.Net Web Application and click on "Add Service Reference" as in the following:

Now Give the URL provided for you in the following dialog BOX
After Providing the URL click Go, the service is populated in the below Dialog where the services are shown.. And provide a Namespace , Here I have given as "IncomeService"
Click on Advanced Button,
Click On Add Web Reference button in the advanced dialog box ,
Click the AddReference Button, You will get a new web reference in Solution Explorer
As shown in above Picture, Now Run the Program note that the Same Webservice name used in our CS page Which was highlighted in CS Code i.e., IncomeService