Monday, 10 September 2018

How to change the root password for MySQL in XAMPP

Method 1: reset XAMPP MySQL root password through web interface:

After you started your XAMPP server, go to the browser and type the URL http://localhost/security/ (incase you’ve modified XAMPP server port, you need to include that port number also in previous URL). The security page will be shown where you can change the root password for MySQL. This will update the phpMyAdmin config also.

Method 2: reset XAMPP MySQL root password through SQL update:

  1. Start the Apache Server and MySQL instances from the XAMPP control panel.
  2. After the server started, open any web browser and give http://localhost:8090/phpmyadmin/ (if you are running XAMPP on 8090 port). This will open the phpMyAdmin interface. Using this interface we can manager the MySQL server from the web browser.
  3. In the phpMyAdmin window, select SQL tab from the right panel. This will open the SQL tab where we can run the SQL queries.
  4. Now type the following query in the textarea and click Go
    UPDATE mysql.user SET Password=PASSWORD('password') WHERE User='root'; FLUSH PRIVILEGES;
  5. Now you will see a message saying that the query has been executed successfully.
  6. If you refresh the page, you will be getting a error message. This is because the phpMyAdmin configuration file is not aware of our newly set root passoword. To do this we have to modify the phpMyAdmin config file.
  7. Open the file [XAMPP Installation Path] / phpmyadmin / config.inc.php in your favorite text editor.
  8. Search for the string $cfg\['Servers'\]\[$i\]['password'] = ''; and change it to like this, $cfg\['Servers'\]\[$i\]['password'] = 'password'; Here the ‘password’ is what we set to the root user using the SQL query.
  9. Now all set to go. Save the config.inc.php file and restart the XAMPP server.

Method 3: reset XAMPP MySQL root password through Command Prompt


Set the mysql/bin folder path to the environment variables $path and $temp in computer

Run the mysql in xamp server.

and execute the following command in command prompt (Don't forget to choose 'Run as Administrator' option while selecting command prompt)

c:\>mysqladmin.exe -u root password root_password (provide your root_password).

All set, now connect to mysql using the following command

c:\>mysql -u root -p
Enter password: *********
Welcome to the MariaDB monitor.  Commands end with ; or \g.
Your MariaDB connection id is 8
Server version: 10.4.20-MariaDB mariadb.org binary distribution

Copyright (c) 2000, 2018, Oracle, MariaDB Corporation Ab and others.

Type 'help;' or '\h' for help. Type '\c' to clear the current input statement.

MariaDB [(none)]> > show databases;
+--------------------+
| Database           |
+--------------------+
| information_schema |
| mysql              |
| performance_schema |
| phpmyadmin         |
| test               |
+--------------------+
5 rows in set (0.023 sec)

The above command shows list of databases in mysql. 

Wednesday, 1 August 2018

Facybox in yii -- show images using fancy box

Previously I used thumbnail image and by clicking on the image the page redirects to another tab which shows complete image in the browser
 I done using this

 echo "<a target='_blank' href='$imagepath'>
        <img class='limg' src='$imagepath' alt='Latest Image' style='width:150px'>
      </a>";

Source link: https://www.w3schools.com/howto/howto_css_thumbnail.asp

Code as

<style>
img {
    border: 1px solid #ddd; /* Gray border */
    border-radius: 4px;  /* Rounded border */
    padding: 5px; /* Some padding */
    width: 150px; /* Set a small width */
}

/* Add a hover effect (blue shadow) */
img:hover {
    box-shadow: 0 0 2px 1px rgba(0, 140, 186, 0.5);
}
</style>
<body>

<a target="_blank" href="img_forest.jpg">
  <img src="img_forest.jpg" alt="Forest">
</a>

</body>

But I am not satisfied with this everyimage I need to open in seperate tabs and check them instead the fancy box looking cool to achieve this in YII download the extension from the below link


https://www.yiiframework.com/extension/fancybox

download the extension and copy the folder fancybox in app_folder/extensions/ location and give permissions to the folder (read and write). 

if(strtoupper((string)$image)!='NIL'){

  echo "<td>";

  echo CHtml::link("<img src='$imagepath' alt='Latest Image' style='width:150px' /><p><b> Updated on $recentimgupd</b></p>","#oimg", array('id'=>'latestimg'));
    /* echo '&lt;div style="display:none"&gt;
    &lt;div id="data"&gt;
        Lorem ipsum dolor sit amet, consectetur adipiscing elit.
    &lt;/div&gt;
    &lt;/div&gt;';  */
echo "<div style='display:none'>;
    <div id='oimg'>
        <a target='_blank' href='$imagepath'><img src='$imagepath' alt='Latest Image' />
         <p><b> Latest Photo Updated on $recentimgupd</b></p></a>
    </div>;
</div>";
 $this->widget('application.extensions.fancybox.EFancyBox', array(
    'target'=>'a#latestimg',
    'config'=>array(
        'scrolling'   => 'yes',
        'titleShow'   => true,
        'mouseEnabled'  => true,
        /* 'prevEffect' => 'none',
        'nextEffect' => 'none',
        'closeBtn' => false,
         'helpers' => (
                  'title' => ('type' => 'inside'),
                  'buttons' => (),
                ),   */
            ),
    )
);

    /* echo "<a target='_blank' href='$imagepath'>
        <img class='limg' src='$imagepath' alt='Latest Image' style='width:150px'>
      </a>"; */
      echo "</td>";
}else{
  echo "<td><center>No Image</center></td>";
}

Thursday, 21 June 2018

MySQL Incorrect datetime value: '0000-00-00 00:00:00' Problem rectification Error 1292 (22007) in mysql

Solution for  ERROR 1292 (22007): Incorrect datetime value: '0000-00-00 00:00:00' for column 'created' at row 1

(on MySQL 5.7.13).
I kept getting the Incorrect datetime value: '0000-00-00 00:00:00' error.
Strangely, this worked: SELECT * FROM users WHERE created = '0000-00-00 00:00:00'. I have no idea why the former fails and the latter works... maybe a MySQL bug?

At any case, this UPDATE query worked:
UPDATE users SET created = NULL WHERE CAST(created AS CHAR(20)) = '0000-00-00 00:00:00'
All the best !!!

Install phpMyAdmin in Ubuntu 16.04 LTS

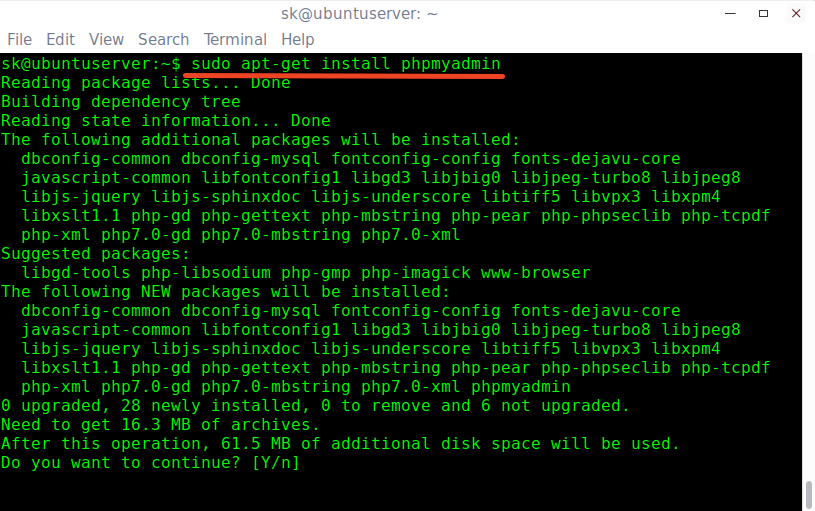
phpMyAdmin is available in the default repositories of Ubuntu operating system. Once LAMP stack is installed and ready, install phpMyAdmin as shown below:


sudo apt-get install phpmyadmin


Install phpmyadmin
Install phpmyadmin
During installing, you’ll be asked to choose the web server that should be automatically configured to run phpMyAdmin. In our case, it is Apache webserver.
Choose apache2 and click OK.
sk@ubuntuserver: ~_002
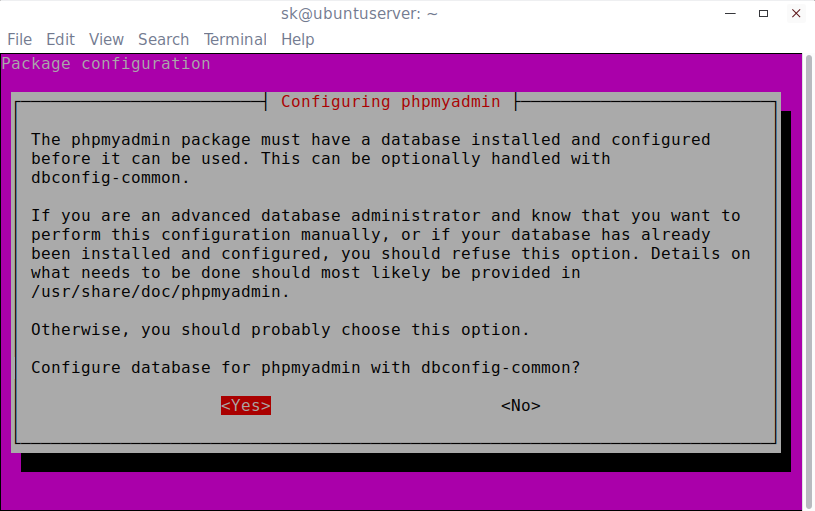
Select Yes and hit ENTER to configure database for phpmyadmin with dbconfig-common.
sk@ubuntuserver: ~_003
Enter a password for phpmyadmin to register with the database server. If left blank, a random password will be generated.
sk@ubuntuserver: ~_004
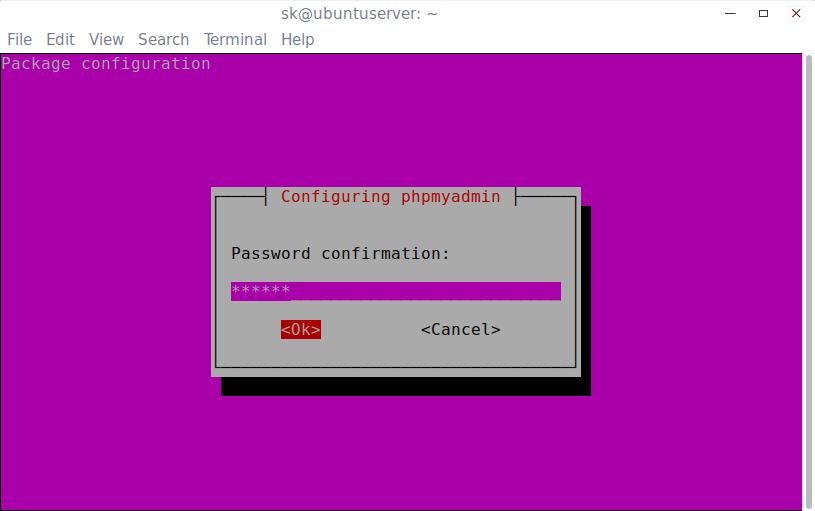
Re-enter the password to confirm:
sk@ubuntuserver: ~_005
Oops! You might be encountered with the following error message:
An error occurred while installing the database: 

ERROR 1045 (28000): Access denied for user 'root'@'localhost' (using 
password: NO) . Your options are: 
* abort - Causes the operation to fail; you will need to downgrade, 
   reinstall, reconfigure this package, or otherwise manually intervene 
   to continue using it. This will usually also impact your ability to 
   install other packages until the installation failure is resolved. 
* retry - Prompts once more with all the configuration questions 
   (including ones you may have missed due to the debconf priority 
   setting) and makes another attempt at performing the operation. 
* retry (skip questions) - Immediately attempts the operation again, 
   skipping all questions. This is normally useful only if you have 
   solved the underlying problem since the time the error occurred.
sk@ubuntuserver: ~_006
To fix this issue, click OK and abort the phpMyAdmin installation.
sk@ubuntuserver: ~_007
Log in to MariaDB or MySQL prompt with root user using command:
mysql -u root -p
Create a new database and database user for phpMyAdmin and grant full permission to the phpmyadmin user.
For the purpose of this tutorial, I am going to create a database called “phpmyadmindb”, and database user “phpmyadminuser” with password “ubuntu”. Please use a strong password which is very hard to guess in the production environment.
Welcome to the MariaDB monitor. Commands end with ; or \g.
Your MariaDB connection id is 52
Server version: 10.0.25-MariaDB-0ubuntu0.16.04.1 Ubuntu 16.04

Copyright (c) 2000, 2016, Oracle, MariaDB Corporation Ab and others.

Type 'help;' or '\h' for help. Type '\c' to clear the current input statement.

MariaDB [(none)]> CREATE DATABASE phpmyadmindb;
Query OK, 1 row affected (0.01 sec)

MariaDB [(none)]> GRANT ALL ON phpmyadmindb.* TO phpmyadminuser@localhost IDENTIFIED BY 'ubuntu';
Query OK, 0 rows affected (0.00 sec)

MariaDB [(none)]> flush privileges;
Query OK, 0 rows affected (0.00 sec)

MariaDB [(none)]> \q
Bye
sk@ubuntuserver: ~_009
Then, edit phpmyadmin/config-db.php file:
sudo nano /etc/phpmyadmin/config-db.php
Replace the database name, database user and its password with the values that you have created earlier.
[...]

$dbuser='phpmyadminuser';
$dbpass='ubuntu';
$basepath='';
$dbname='phpmyadmindb';
$dbserver='localhost';
$dbport='';
$dbtype='mysql';
sk@ubuntuserver: ~_010
Save and close the file.
Next, you must install the following php modules. Otherwise, you will get an error message that says:
The mbstring extension is missing. Please check your PHP configuration.
To install php modules, run:
sudo apt-get install php-mbstring php7.0-mbstring php-gettext
Then, edit Apache webserver config file:
sudo nano /etc/apache2/apache2.conf
Add the following line at the end:
Include /etc/phpmyadmin/apache.conf
sk@ubuntuserver: ~_011
Save and close the file. Restart apache service to take effect the changes.
sudo systemctl restart apache2

Access phpMyAdmin dashboard

Open up the web browser and navigate to http://IP-Address/phpmyadmin.
You should see the following screen. Enter the MariaDB/MySQL ‘root’ user name and its password.
phpMyAdmin - Chromium_012
Congrats! This is how the phpMyAdmin dashboard looks like.
192.168.1.105 - localhost | phpMyAdmin 4.5.4.1deb2ubuntu2 - Chromium_013
From here, you can create, delete, rename, and manage the databases easily.
Source : https://www.ostechnix.com/install-phpmyadmin-with-lamp-stack-on-ubuntu-16-04/

Wednesday, 20 June 2018

To display hyperlinks in cdetailview in yii that is to display uploaded files in yii

<?php $path = Yii::app()->baseUrl."/uploads/"; ?>  // First we have to Declare the path before the attaching the filename in the link this is the key step. 

/* then after we can defile the attribute as follows */
<?php $this->widget('zii.widgets.CDetailView', array(
'data'=>$model,
'attributes'=>array(
'lan_no',
array(
'label' => 'Uploaded Image',
'type'=>'raw',
'value' => CHtml::link(CHtml::encode($model->image), $path .$model->image,array("target"=>"_blank"))
),
'man_code',
'vil_code',
'loc_name',
'sur_no',
'tsno',
'blo_name',
'nala_rem',
),
)); ?>

That's it if you want you can remove the target="_blank" option 

To display uploaded files in Cgridview ( in admin view ) in yii

<?php $this->widget('zii.widgets.grid.CGridView', array(
'id'=>'works-grid',
'dataProvider'=>$model->search(),
'filter'=>$model,
'columns'=>array(
'id',
'department',
'descofwork',
'typeofwork',
'workstatusrem',
array(
'header' => 'WORK Agreement Copy',         // Header  for the column
'name' => 'workagreement',                           // Name of the database field
'value' => '($data->workagreement === "NIL" ? $data->workagreement :CHtml::link($data->workagreement,Yii::app()->baseUrl."/uploads/".$data->workagreement,array("target"=>"_blank")))',
'type'=>'raw',
),
'place',
'village',
array(
'class'=>'CButtonColumn',
'template'=>$format,
),
),
)); ?>

Tuesday, 20 February 2018

How To Install the Apache Web Server on Ubuntu 16.04

Introduction

The Apache HTTP server is the most widely-used web server in the world. It provides many powerful features including dynamically loadable modules, robust media support, and extensive integration with other popular software.
In this guide, we'll discuss how to install an Apache web server on your Ubuntu 16.04 server.

Prerequisites

Before you begin this guide, you should have a regular, non-root user with sudo privileges configured on your server. Additionally, you will need to configure a basic firewall to block non-essential ports. You can learn how to configure a regular user account and set up a firewall for your server by following our initial server setup guide for Ubuntu 16.04.
When you have an account available, log in as your non-root user to begin.

Step 1: Install Apache

Apache is available within Ubuntu's default software repositories, so we will install it using conventional package management tools.
We will begin by updating the local package index to reflect the latest upstream changes. Afterwards, we can install the apache2 package:
  • sudo apt-get update
  • sudo apt-get install apache2
After confirming the installation, apt-get will install Apache and all required dependencies.

Step 2: Adjust the Firewall

Before we can test Apache, we need to modify our firewall to allow outside access to the default web ports. Assuming that you followed the instructions in the prerequisites, you should have a UFW firewall configured to restrict access to your server.
During installation, Apache registers itself with UFW to provide a few application profiles. We can use these profiles to simplify the process of enabling or disabling access to Apache through our firewall.
We can list the ufw application profiles by typing:
  • sudo ufw app list
You should get a listing of the application profiles:
Output
Available applications: Apache Apache Full Apache Secure OpenSSH
As you can see, there are three profiles available for Apache:
  • Apache: This profile opens only port 80 (normal, unencrypted web traffic)
  • Apache Full: This profile opens both port 80 (normal, unencrypted web traffic) and port 443 (TLS/SSL encrypted traffic)
  • Apache Secure: This profile opens only port 443 (TLS/SSL encrypted traffic)
For our purposes, we will allow incoming traffic for the Apache Full profile by typing:
  • sudo ufw allow 'Apache Full'
You can verify the change by typing:
  • sudo ufw status
You should see HTTP traffic allowed in the displayed output:
Output
Status: active To Action From -- ------ ---- OpenSSH ALLOW Anywhere Apache Full ALLOW Anywhere OpenSSH (v6) ALLOW Anywhere (v6) Apache Full (v6) ALLOW Anywhere (v6)
As you can see, the profile has been activated to allow access to the web server.

Step 3: Check your Web Server

At the end of the installation process, Ubuntu 16.04 starts Apache. The web server should already be up and running.
We can check with the systemd init system to make sure the service is running by typing:
  • sudo systemctl status apache2
Output
● apache2.service - LSB: Apache2 web server Loaded: loaded (/etc/init.d/apache2; bad; vendor preset: enabled) Drop-In: /lib/systemd/system/apache2.service.d └─apache2-systemd.conf Active: active (running) since Fri 2017-05-19 18:30:10 UTC; 1h 5min ago Docs: man:systemd-sysv-generator(8) Process: 4336 ExecStop=/etc/init.d/apache2 stop (code=exited, status=0/SUCCESS) Process: 4359 ExecStart=/etc/init.d/apache2 start (code=exited, status=0/SUCCESS) Tasks: 55 Memory: 2.3M CPU: 4.094s CGroup: /system.slice/apache2.service ├─4374 /usr/sbin/apache2 -k start ├─4377 /usr/sbin/apache2 -k start └─4378 /usr/sbin/apache2 -k start May 19 18:30:09 ubuntu-512mb-nyc3-01 systemd[1]: Stopped LSB: Apache2 web server. May 19 18:30:09 ubuntu-512mb-nyc3-01 systemd[1]: Starting LSB: Apache2 web server... May 19 18:30:09 ubuntu-512mb-nyc3-01 apache2[4359]: * Starting Apache httpd web server apache2 May 19 18:30:09 ubuntu-512mb-nyc3-01 apache2[4359]: AH00558: apache2: Could not reliably determine the server's fully qualified domain name, using 127.0.1.1. Set the 'ServerName' directive globally to suppress this message May 19 18:30:10 ubuntu-512mb-nyc3-01 apache2[4359]: * May 19 18:30:10 ubuntu-512mb-nyc3-01 systemd[1]: Started LSB: Apache2 web server.
As you can see above, the service appears to have started successfully. However, the best way to test this is to actually request a page from Apache.
You can access the default Apache landing page to confirm that the software is running properly. You can access this through your server's domain name or IP address.
If you are using DigitalOcean and do not have a domain name set up for your server, you can follow our guide how to set up a domain with DigitalOcean to set one up.
If you do not want to set up a domain name for your server, you can use your server's public IP address. If you do not know your server's IP address, you can get it a few different ways from the command line.
Try typing this at your server's command prompt:
  • hostname -I
You will get back a few addresses separated by spaces. You can try each in your web browser to see if they work.
An alternative is typing this, which should give you your public IP address as seen from another location on the internet:
  • sudo apt-get install curl
  • curl -4 icanhazip.com
When you have your server's IP address or domain, enter it into your browser's address bar:
http://server_domain_or_IP
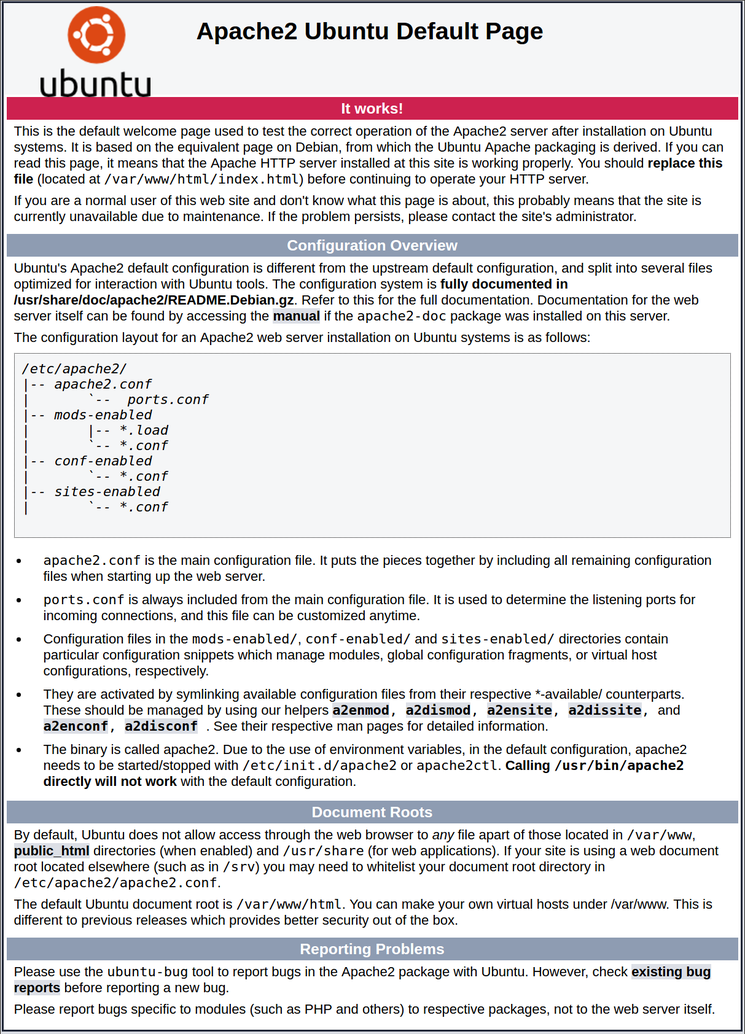
You should see the default Ubuntu 16.04 Apache web page, which should look something like this:
Apache default page
This page is simply included to show that Apache is working correctly. It also includes some basic information about important Apache files and directory locations.

Step 4: Manage the Apache Process

Now that you have your web server up and running, we can go over some basic management commands.
To stop your web server, you can type:
  • sudo systemctl stop apache2
To start the web server when it is stopped, type:
  • sudo systemctl start apache2
To stop and then start the service again, type:
  • sudo systemctl restart apache2
If you are simply making configuration changes, Apache can often reload without dropping connections. To do this, you can use this command:
  • sudo systemctl reload apache2
By default, Apache is configured to start automatically when the server boots. If this is not what you want, you can disable this behavior by typing:
  • sudo systemctl disable apache2
To re-enable the service to start up at boot, you can type:
  • sudo systemctl enable apache2
Apache should now start automatically when the server boots again.

Step 5: Get Familiar with Important Apache Files and Directories

Now that you know how to manage the service itself, you should take a few minutes to familiarize yourself with a few important directories and files.

Content

  • /var/www/html: The actual web content, which by default only consists of the default Apache page you saw earlier, is served out of the /var/www/html directory. This can be changed by altering Apache configuration files.

Server Configuration

  • /etc/apache2: The Apache configuration directory. All of the Apache configuration files reside here.
  • /etc/apache2/apache2.conf: The main Apache configuration file. This can be modified to make changes to the Apache global configuration. This file is responsible for loading many of the other files in the configuration directory.
  • /etc/apache2/ports.conf: This file specifies the ports that Apache will listen on. By default, Apache listens on port 80 and additionally listens on port 443 when a module providing SSL capabilities is enabled.
  • /etc/apache2/sites-available/: The directory where per-site "Virtual Hosts" can be stored. Apache will not use the configuration files found in this directory unless they are linked to the sites-enabled directory (see below). Typically, all server block configuration is done in this directory, and then enabled by linking to the other directory with the a2ensite command.
  • /etc/apache2/sites-enabled/: The directory where enabled per-site "Virtual Hosts" are stored. Typically, these are created by linking to configuration files found in the sites-available directory with the a2ensite. Apache reads the configuration files and links found in this directory when it starts or reloads to compile a complete configuration.
  • /etc/apache2/conf-available/, /etc/apache2/conf-enabled/: These directories have the same relationship as the sites-available and sites-enabled directories, but are used to store configuration fragments that do not belong in a Virtual Host. Files in the conf-available directory can be enabled with the a2enconf command and disabled with the a2disconf command.
  • /etc/apache2/mods-available/, /etc/apache2/mods-enabled/: These directories contain the available and enabled modules, respectively. Files in ending in .load contain fragments to load specific modules, while files ending in .conf contain the configuration for those modules. Modules can be enabled and disabled using the a2enmod and a2dismod command.

Server Logs

  • /var/log/apache2/access.log: By default, every request to your web server is recorded in this log file unless Apache is configured to do otherwise.
  • /var/log/apache2/error.log: By default, all errors are recorded in this file. The LogLevel directive in the Apache configuration specifies how much detail the error logs will contain.